Tag Archives: oracle

Installing Jasperserver pro (Evaluation) with Oracle

Installing Jasperserver pro with Oracle in Evaluation period is bit tricky, because bundle we download from server can only installer with Postgres SQL.

Below steps explain how to install platform independent Jasperserver pro in your system with Oracle repository.

  1. Download the Jaspersoft pro evaluation from here (Lets say we downloaded windows version)download
  2. Install jaspersoft pro in windows machine, by default it will install with Postgres SQL  Install
  3. Once it’s installed with Postgres SQL, now it’s time to rebuild the war file and pointing it to oracle.
    Note:- we tried to reconfigure just configuration files as in other website told but it doesn’t work 100%, you will get some error like invalid characters and some more errors. So please follow below steps for 100% success.
  4. First lets  tweak and fix the path before building ant.
    • Copy the folder %JASEPER_HOME%\apache-tomcat\webapps\jasperserver-pro into %JASPER_HOME%\buildomatic\install_resources\war\jasperserver-pro (create the folder war if it doesn’t exists)
    • Delete the folder %JASER_HOME%\buildomatic\build_conf
  5. Copy and rename the file inside %JASPER_HOME%\buildomatic\sample_conf\oracle_master.properties into %JASPER_HOME%\buildomatic\ and rename the file into default_master.properties
  6. edit the file default_master.properties file tomcat version, location of tomcat(different location than that is in %JASPER_HOME%), connection parameter of oracle, system username and password and jasperserver schema name and password you want to create like as in the attached file default_master.properties
  7. Once you followed everything as per above, its time to build the oracle database repository and war file for oracle.
    • Commands Description
      cd %JASPER_HOME\buildomatic Makes the buildomatic directory your current directory.
      js-ant create-js-db Creates the JasperReports Server repository database.
      js-ant create-sugarcrm-dbjs-ant create-foodmart-db (Optional) Creates the sample databases.
      js-ant load-sugarcrm-dbjs-ant load-foodmart-db (Optional) Loads sample data into the sample databases.
      js-ant init-js-db-projs-ant import-minimal-pro Initializes the jasperserver database, loads core application data. Running js-ant import-minimal-pro is mandatory. The server cannot function without this data.
      js-ant import-sample-data-pro (Optional) Loads the demos that use the sample data.
      js-ant deploy-webapp-pro Configures and deploys the WAR file to Tomcat, JBoss, or Glassfish.

      Reference: Jasperserver Site
      Normally, minimal(excluding optional options) is enough and it makes Jasperserver clean from unnecessary objects being created.

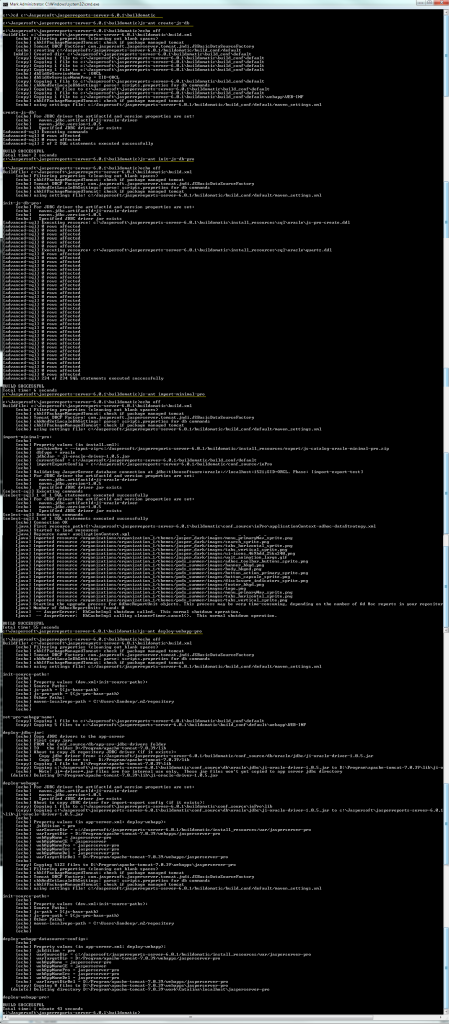
    • Output: – Installation
  8. After following all above steps without any error. its time to install the jasperserver license.
    • Copy %JASPER_HOME%\jasperserver.license to home directory
      Operating System Location
      Linux /home/<user>/  or ~/
      Windows C:\Users\<user>\
      Solaris /export/home/<user> or ~/
      or if you want to put in user defined location then please follow the link
  9. Now run the Tomcat (not the %JASPER_HOME%\tomcat) and everything should be fine

Migrating Jasperserver and oracle repository.

  1. Take a backup and restore oracle schema JASPERSERVER, FOODMART and SUGARCRM(if exists) into destination oracle server.
  2. Copy Jasperserver-pro webapps folder to Application server.
  3. edit the file located in jasperserver-pro webapps folder %TOMCAT%\webapps\jasperserver-pro\META-INF\context.xml file and configure Oracle url, schema name and password for jdbc/jasperserver, jdbc/sugarcrm, jdbc/foodmart
  4. Copy the file jasperserver.license and copy to user home directory as said in above
  5. Start the Tomcat and finished 🙂

If Evaluation period is expired

if evaluation period is expired then install the initially downloaded from jasperserver website with postgres sql in any test machine, which will generate the jasperserver.license and copy that file into existing jasperserver machine.


Reference:-

https://community.jaspersoft.com/documentation/jasperreports-server-source-build-guide/v561/additional-buildomatic-information

https://community.jaspersoft.com/questions/813885/how-configure-jasper-server-oracle-11g


Load File into Database as Blob

You can find lots of procedure or steps to load file from filesystem to database.
one of the easy method is to make a function.
Sample of function:-
CREATE OR REPLACE FUNCTION FN_FILE_BLOB(V_FILENAME VARCHAR2, V_DIRECTORY VARCHAR2) RETURN BLOB
IS
src_loc BFILE;
dest_loc BLOB:=empty_blob();
BEGIN
SRC_LOC := BFILENAME(V_DIRECTORY, V_FILENAME);
DBMS_LOB.OPEN(src_loc, DBMS_LOB.LOB_READONLY);
DBMS_LOB.CREATETEMPORARY(lob_loc => dest_loc, cache => true , dur => dbms_lob.session);
DBMS_LOB.OPEN(dest_loc, DBMS_LOB.LOB_READWRITE);
DBMS_LOB.LOADFROMFILE(dest_lob => dest_loc, src_lob => src_loc , amount => DBMS_LOB.getLength(src_loc));
DBMS_LOB.CLOSE(src_loc);
DBMS_LOB.CLOSE(dest_loc);
RETURN dest_loc;
EXCEPTION
WHEN Others THEN
Dbms_Output.Put_Line(SQLERRM);
RETURN NULL;
END;
/

Usage: SELECT FN_FILE_BLOB('image1.jpg','DUMP_DIR') FROM DUAL;

Convert Blob into Insert Statment

There are many ways to copy Blob column from one server to Another like,

1. Generate file from blob in source server, and import file into destination server using Tools like SQL developer, TOAD.

2. Using DBLink,
INSERT INTO BLOB_TEST SELECT BLOB_COL1 FROM TEST_BLOB@SOURCEDB;
3.  I have recently discovered, you can make dynamic insert statement and run as normal insert statement in destination server.

Example here: sample_blob

Scripts to make dynamic script can be written as

Set serveroutput on
DECLARE
M BLOB;
n NUMBER:=1;
c blob;
l_limit NUMBER:=4000;
vm RAW(32767);
BEGIN
Dbms_Output.Put_Line('DECLARE
c BLOB;
BEGIN
dbms_lob.createtemporary(c,true);');
SELECT  BLOB_COL INTO M FROM TEST_BLOB;
--Dbms_Output.Put_Line(Length(M));
while (n+l_limit<=length(m)) loop
     vm:=(dbms_lob.substr(M,l_limit,n));
     Dbms_Output.Put_Line('dbms_lob.writeappend(c,'||Length(vm)/2||','''||VM||''');');
     n:=n+l_limit;
END LOOP;
vm:=(dbms_lob.substr(M,length(m)-n+999,n));
Dbms_Output.Put_Line('dbms_lob.writeappend(c,'||Length(vm)/2||','''||VM||''');');
Dbms_Output.Put_Line('INSERT INTO blob_test VALUES (c,9);
END;
/');
END;
/

Download Here

Mail Client in Oracle Database

Yes you can receive Mail and send in Oracle Database and store into Database or manipulate email to do some task.
I m always lazy to do some repetative task In my Work i was always ask to do send status of certain task from Database and send to back to them via mail. for a beginning it is fun. but when the request number is increasing it is getting boring and monotonous. so what i did is i installed Mail client in one the schema in my Database which reads emails. then i scheduled the job which reads subject of emails that has keyword [Status] and followed by Report Name. so the scheduler reads and do query and generate report in clob and sends the output to sender Mail.

Installing Oracle 11g in RHEL 5


  1. Checking the network setup:
a.       Verify the hostname (Issue command hostname)
b.      Change the current hostname in kernel
sysctl kernel.hostname=NEW_HOSTNAME
2.      Editing Hostname /etc/hosts
                127.0.0.1      localhost.localdomain localhost
      ::1            localhost6.localdomain6 localhost6
      192.168.x.x   fullhostname       hostname
               
3.      All necessary prerequisites will be performed automatically.
If you plan to use the “oracle-rdbms-server-11gR2-preinstall” package to perform all your prerequisite setup, follow the instructions at https://public-yum.oracle.com to setup the yum repository for OL, then perform the following command.
        # cd /etc/yum.repos.d
        # mv Oracle-Base.repo Oracle-Base.repo.disabled
        # wget https://public-yum.oracle.com/public-yum-el5.repo
        # yum list
  # yum install oracle-rdbms-server-11gR2-preinstall
        Or 
        # yum install oracle-validated
4.       Manual Configuration.
4.1   Add the following lines to the /etc/security/limits.conf file:
      oracle              soft    nproc   2047
      oracle              hard    nproc   16384
      oracle              soft    nofile  4096
      oracle              hard    nofile  65536
      oracle              soft    stack   10240
4.2   Edit /etc/selinux/config file and disable SELINUX
                SELINUX=disabled
5         Create the new groups and users:
      groupadd -g 501 oinstall
      groupadd -g 502 dba
      groupadd -g 503 oper
      useradd –u 502 -g oinstall -G dba oracle
      passwd oracle
6         Create the directories in which the Oracle software will be installed:
      mkdir -p /u01/app/oracle
      chown -R oracle.oinstall /u01
7         Login as root and issue the following command:
      xhost +
8         Edit /home/oracle/.bash_profile from oracle user as:
export ORACLE_HOSTNAME=hostname;
export ORACLE_UNQNAME=orclunq;
export ORACLE_BASE=/u01/app/oracle;
export ORACLE_HOME=$ORACLE_BASE/product/11.2.0/db_1;
export ORACLE_SID=orcl;
export PATH==$ORACLE_HOME/bin:$ORACLE_HOME/OPatch:/usr/sbin:$PATH;
export LD_LIBRARY_PATH=$ORACLE_HOME/lib:/lib:/usr/lib;
export CLASSPATH=$ORACLE_HOME/jlib:$ORACLE_HOME/rdbms/jlib;
9         Unzip Installer of Oracle Database
                # unzip oracle_Linux-x86-64_1of2.zip
      # unzip oracle_Linux-x86-64_1of2.zip
10     Start the Oracle Universal Installer (OUI) by issuing the following command in the database  directory:
      # ./runInstaller
11     Fix the RPM issues and Kernel Parameters as suggested
12     Follow the GUI generated by OUI to complete the installation according to requirement.
13     Install Only Software, By choosing Setup Wizard.
14     After installation of software create database with command
      # dbca
14.1.1      While setting Memory Parameter, Check off the Automatic Memory Management Check Box and choose Set SGA/PGA with Needs

HostName greater than 32 Character

When your server’s hostname exceeds 32 character, then there might have an issue of creating or Running enterprise Manager repository.
for a solution here are the steps to follow.
got to folder $ORACLE_HOME/sysman/admin/emdrep/sql/core/latest/self_monitor$ cd $ORACLE_HOME/sysman/admin/emdrep/sql/core/latest/self_monitor

backup the sqlfile self_monitor_post_creation.sql to any other name incase you need it.
$ cp self_monitor_post_creation.sql self_monitor_post_creation_bk.sql

and edit word “l_host_name  varchar2(32)” to “l_host_name  varchar2(50)” in 2 places of self_monitor_post_creation.sql file

and recreate the enterprise manager repository
 $ emca -config dbcontrol db -repos recreate